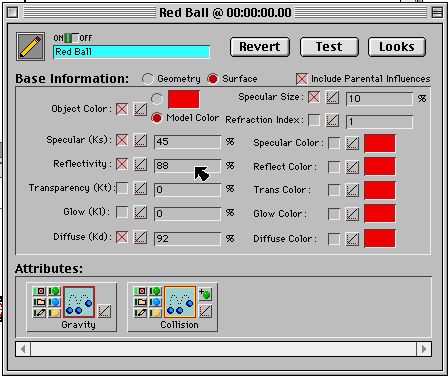
Figure 8-1. The Properties box. Surface properties can be seen and modified by clicking on the Surface radio button. The Looks button provides an easy interface for seeing the effects of the Surface items.
Now that we have the basics of object creation and motion have been covered, it's time to look at the really neat aspects of 3DJoy computer animation: adjusting surface properties and mapping pictures to objects.
Surface properties cover characteristics of Color, Reflectivity, Transparency, Glow, Diffusiveness, and Specular reflection. These items are controlled from the object's properties box. There are two ways to modify the surface properties one is to click the "Surface" radio button next to the Base Information label. This will change the display in the Properties box to show different options. These options can be activated by clicking in the boxes to check them, and adjusting their numerical values.
Figure 8-1. The Properties box. Surface properties can be seen and
modified by clicking on the Surface radio button. The Looks button
provides an easy interface for seeing the effects of the Surface items.
An easier way to change how an object appears is to click the Looks button. This calls up a box (figure 8-2) that displays a sample object and the results of the combined Surface properties settings. The object's color can be changed by clicking in the color swatch next to the Master: label. Other properties can be changed by adjusting the slider bars.
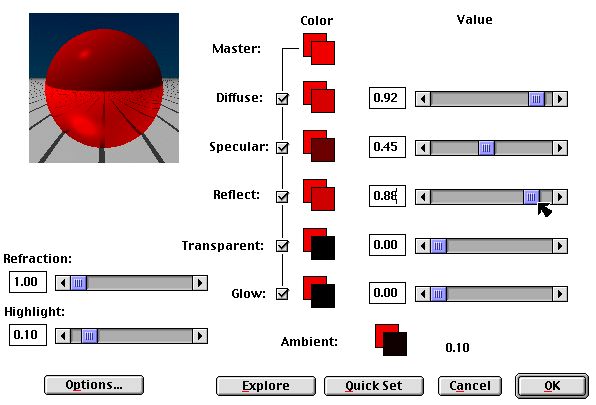
Figure 8-2. Surface properties can be seen and changed in the Looks box.
In these pictures, I have adjusted the Red so that it has a shiny metal appearance, mostly by using a high value for Reflection. You can do a test render to see how the object will look by clicking the Properties box's Test button. While this works to a certain extent, the true look will be when the whole scene is rendered using the camera icon.
Next, I'll give the Green ball a glass appearance by using a high value for the Transparency, plus a little bit of reflection.. Also, if you've ever looked into a crystal ball, you'd notice that anything you look at appears upside down. This is simulated by adjusting the Refraction to 2. A little Specular Reflection helps the ball stand out. These settings can be seen in figure 8-3.
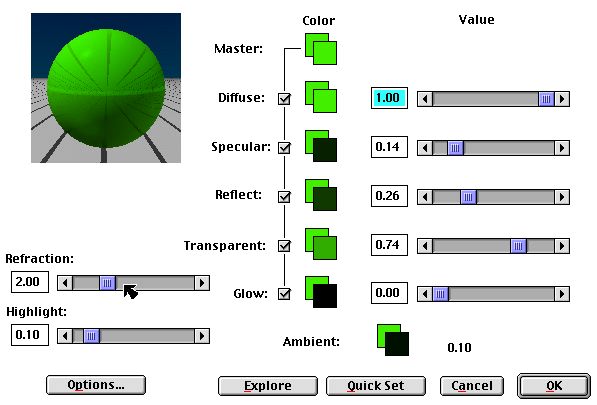
Figure 8-3. Surface properties for the Green glass ball.
After changing the surface properties for the two balls, you will want to save your project before moving on to the next section.
For the third ball I will do something a bit different. I will take a picture and paste it onto the ball. 3DJoy can take any PICT image and use it as a texture for mapping onto objects. These images reside in the Textures folder located in the Plugins folder.
In this movie, I'm knocking the Blue ball into oblivion so an appropriate image to paste onto it is the following:
Just save this PICT image (click on the image in you Web browser and use the Save as... menu item) into your 3DJoy Textures folder. You will need to close your model and then use the "Re-Scan for plug-ins..." item under the File menu to update the Attributes' Textures list.
Since we're adding pictures to things, let's make the floor more floor-like by adding the following picture to your Textures folder:
This is an image of my living room floor taken with a camcorder and video captured. A photograph of the floor that was scanned in would give a better picture, as would a digital camera, but those options require more effort or a lot more cash. The video capture method works reasonably well if you're not too critical about the image quality and just want some background textures like wood floors, brick walls, faces(?), etc.
Note: On some browsers, the two PICT images will show up with broken image icons, don't worry, just click and hold on the icon and a menu will appear; choose the Save Image as menu item as you would a regular image.
The ideal type and size for texture pictures are PICT images of 512 x 512 pixels. The above images are a bit small but will do fine for this tutorial.
Once your new images are in the Textures folder, you have Re-scanned for Plug-ins, and you have reopened the model, click on the the Blue ball at time 0.00 to open its properties box. Open the Attributes box from the Windows menu (Command 2) and select Textures from the pull-down menu. Next, drag the happyface.PICT image to the Attributes section of the Blue Ball's properties box as in figure 8-4.
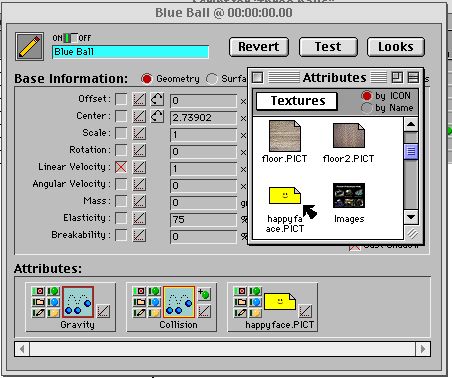
Figure 8-4. Adding a texture picture to the ball.
Next, double-click on the picture icon in the Attributes section of the Blue Ball's properties box to bring up the Mapping box. In the upper left corner is a pull-down menu of several mapping choices. Since the ball is a spherical object, choose Spherical from the list. Then click on the "Fit to object" button and then OK. The final mapping should show all three sphere views overlayed with a red mesh as in figure 8-5.
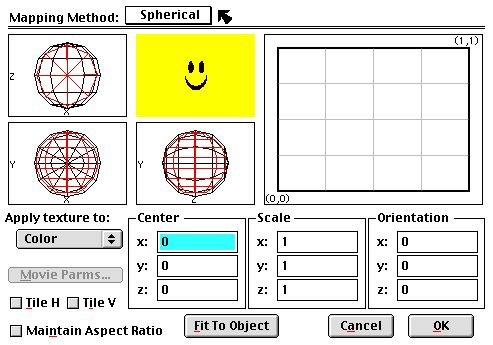
Figure 8-5. Adding a texture picture to the ball.
Use the Test button to see what the ball now looks like. It no longer shows a blue ball, but a smiley face! If the image wasn't completely mapped over the ball, some of the blue would still be visible. Images can be stretched with the Scale parameters. To make the ball look more like plastic, increase the reflectivity a bit. If you want it to stand out a little more, add some glow to its looks.
The floor is a little more complicated. 3DJoy's default is to map pictures to objects in the x-y . However, the floor lies in the x-z plane, so it is necessary to use the Orientation box to rotate the mapping plane to be that of the floor.
First, open the Floor's properties box and open the Attributes window. Next drag the Floor.PICT image from the Attributes window to the Attributes section in the properties box. Now double-click on the new image Attribute. For a flat object, I have found that it is necessary to use the "Projection" mapping method rather than the default "Wrap."
Next, I need to change the orientation of the mapping. The Orientation parameters are given in degrees (360 for a full circle, 90 for a right angle.) Here I used 0 for x, 90 for y, and 90 for z to get the picture in the right orientation for the model.
it is also important to change the scale; I found an x and y of 20 fits well. However, this does not cover the entire floor as can be seen with the red overlay of the object. Instead of stretching out my image, I maintain the Aspect Ratio and tile the image across the surface. These final adjustments are shown in figure 8-6.
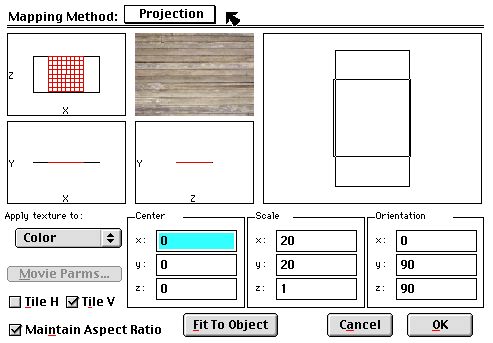
Figure 8-6. Adding a texture picture to the floor.
Finally, since I'd like my floor to have a high gloss shine (my real floor doesn't!) I'll add some reflection in its Properties box. That does it for the floor.
Now, all that needs to be done is to position the camera in a good location (at time 0.00!), save the model one last time, and let the rendering begin! For the final movie, pictured in figure 8-7, I used the ray tracer renderer.
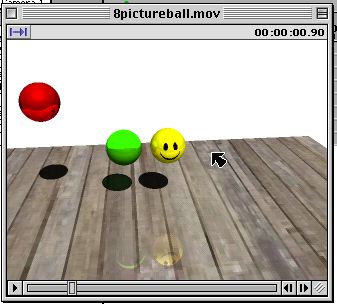
Figure 8-7. A frame from the final movie.
Here is the completed movie of the three balls bouncing with the mapped pictures. Note how the reflections of the balls on the floor and in each other. The movie's file size is 5.8 MB.
Incidentally, if you move the camera's position at a time other than at the beginning, the movie will have the initial view and then move in a regular fashion to the final (second, third, fourth, etc.) position. This can be used to produce complex panning shots or to follow a moving object.
While there is much more that can be mentioned, the topics covered here should give the beginner a good idea of some of the capabilities of 3DJoy and how to use the program to make some interesting and fun pictures.
I hope that you have enjoyed this tutorial and found useful.
Dr. Steven Sahyun
©1999 Steven Sahyun - sahyuns@ucs.orst.edu