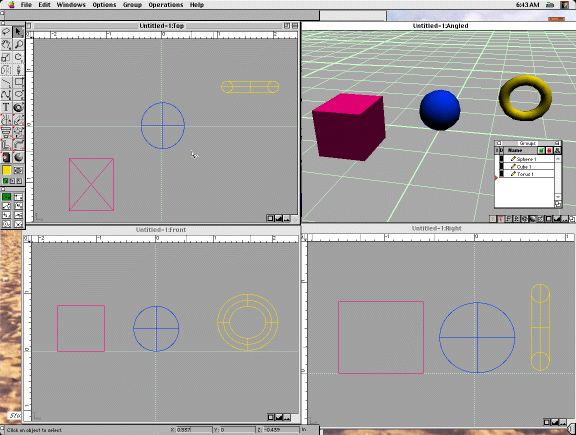
Figure 1-1. This image shows 3DJoy's ModelPro modeler screen. I have created three objects, a red square, a blue ball, and a yellow ring. Notice the four different viewing angles.
This tutorial is designed for people who are new to three-dimensional (3D) computer graphics and the programs that are used to make them. This tutorial is not meant to be a comprehensive book to teach about 3D graphics programs, there are many books out by graphic experts that deal with that topic very well. Rather this tutorial is designed to be a step-by-step guide showing the novice user how to use the 3DJoy program to create a simple object, make it look nice, make it move, and how to then use that movie in a web page such as the one that you are now reading.
Why have I made this guide? When, as a graduate student, I first saw 3DJoy advertised as an inexpensive (free demo) way to be introduced to 3D graphics I was quite excited. Wow, I thought of all of the neat things I could make on my home computer without having to spend hundreds of dollars on a program that I had no knowledge about.
However, I found that the documentation (as with most computer documentation) assumed a familiarity with the field and programs that I did not have. The manuals tended to show complex scenes and advanced topics that I found a little overwhelming. All I really wanted to do was start with something really simple so I could see what the program could do.
Being new to making 3D graphics, I have found the first steps for making 3D graphics somewhat intimidating. I am by no means an expert, and many of the techniques in the advanced tutorials baffle me. I also have to admit that I am a bit lazy in not reading very many books on the subject, and I haven't actively searched for instructors. However, I have figured out how to do a few basic animation techniques and I simply want to share what I have learned. I hope that others may find this tutorial to be of some use for their first steps.
This guide is aimed at others who want to begin to explore the field of 3D graphics but don't have a lot of time and resources to devote to the endeavor. 3DJoy is particularly nice as it doesn't require a supercomputer to provide neat looking pictures and movies. My Mac is a 7200/75 which is a typical older home computer, certainly not a computational powerhouse by today's standards! I've added extra memory (96 MB), a video card, and a bigger hard drive to give it some extra power but that's about it. Yet, with 3DJoy, I can make basic 3D animation in a reasonable amount of time.
3D graphics are pictures of fictional, fantasy, or virtual worlds. The real world that you and I inhabit has three spatial dimensions: height, width, and depth. When we use a 3D program such a 3DJoy, we create a world that uses these three dimensions to describe the placement of objects in space. This virtual world, and all of its objects, only exists in the computer's memory.
We can take a picture of the virtual world using a virtual "camera". The camera's position in the virtual world depends on where we tell the computer to place it. The results are similar to taking a picture of the real world: a two dimensional (height and width) representational image of the world appears on the screen. The objects that are seen in the image depend on the camera's location and where the objects are placed.
The image of the virtual world that we see on the screen depends on what we have put in the world and how hard we want the computer to work to make the image. The process of creating an image from the information stored in the computer's memory is called rendering. The quality of the rendered image can be anywhere from vague cube wire boxes to fully textured surfaces. The wire boxes are drawn very quickly and are useful for locating spatial relationships or to see how an animation will work without waiting a long time. A very complex image with fully textured surfaces looks fantastic, but on slower computers, the picture can seem to take forever to draw.
3DJoy is really a 4D computer graphics program, not 3D. The fourth dimension is time and is important when discussing animation of 3D images. After creating an animation, you can play the created movies forward, backward, or jump to any point in the time sequence. Each frame of the movie is a three dimensional image (ok, really a 2D representation of the 3D world) at some point in the 4th dimension timeline.
3DJoy contains two programs: the ModelPro modeler module, and the Presenter 3D animation module.
When started, the modeler creates a virtual world, then allows you to add and place objects within that world. In the modeler, you can only give objects the basic properties of shape, placement, and color. There are four viewing windows: Top, Left, Right, and Angled. These windows display the images produced by virtual cameras at the four respective locations.
Figure 1-1. This image shows 3DJoy's ModelPro modeler screen. I have created
three objects, a red square, a blue ball, and a yellow ring. Notice the four
different viewing angles.
There are many details about the modeler with which will be mentioned in the next chapter, but this is the basic view of the working environment for creating and placing the objects. On the far left is the tool pallet used for choosing which type of tool to use to make or modify objects. Any created object can be selected in any of the four windows. Double clicking on an object will bring up a window describing its details (height,width, placement, etc.). In this image, there is a floating "Groups" window in the lower right that shows all of the objects in this virtual world.
The Presenter is more than just an animator, it also does the rendering of the world to create a final image. The rendered image depends on where the objects in the virtual world are located at a given point in the timeline.
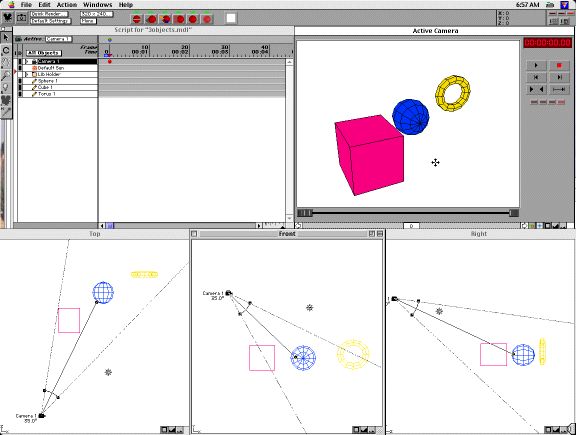
Figure 1-2. This image shows 3DJoy's Presenter 3D screen. These are the same
objects that were created in the modeler. Notice the four different viewing
angles.
The main items of interest in the Presenter screen shot are: the tool bar in the upper left hand corner; the Script window at the top; the Active Camera window in the upper right; and the three world views (Top, Front, and Right) along the bottom.
The world view windows display the spatial location of objects in the three (height, width, and depth) dimensions. These windows also show the position of the single virtual camera, and a single sun. The sun is used to light the image (you need light to see by, right?). If you move the camera's position (by clicking and dragging any of the three views of the camera), the picture in the "Active Camera" window will change accordingly.
The image seen in the Active Camera window is a rough rendering of the scene. This "Quick Rendered" scene allows you to try camera positions and object movements before committing to the more computationally intensive task of a producing a final picture.
The Script window shows the world's time line progressing from left to right. Key events at particular times for the various objects are noted with colored circles or squares. There is a little triangular marker in this window that indicates the current point in time for the displayed scene.
The Presenter will be discussed in more detail starting in chapters 3.
I have found four repositories of useful information. There are the manuals and tutorials on the 3DJoy CD, tutorials online at www.vidi.com, the 3DJoy help menu item located in the Apple menu, and books.
Of all the tutorials on the 3DJoy CD, I have found the Animation Tutorial the most helpful. This file is buried in the Documentation/Presenter Documentation/Presenter Tutorial & Tips/General Tutorial folder. (I found this tutorial the most helpful in part because I actually read and followed a good part of it, and the subject seemed interesting.) There are many tutorials that go into great detail on what each of the items displayed on the screen do, so I'll try not to reinvent the wheel in this tutorial.
The online tutorials are nice if you have a good net connection while you are at your computer, but this isn't possible for everyone. There is a nice description of the Modeler's workspace online.
The program's Help mostly gives brief descriptions as to what the different tools and menu options do. This help file is located under the About... menu item in the Apple menu.
Finally there are the many general 3D graphics books. One can always spend a fortune on books. I have a book (actually my wife picked it up so it's really hers) that certainly looks interesting when I leaf through it. It's called 3D Graphics & Animation. From Starting Up to Standing Out by Mark Giambruno (ISBN 1-56205-698-0).
Well, that's enough of an introduction, lets make something!
©1999 Steven Sahyun - sahyuns@ucs.orst.edu